How to Create a Surreal Scene with an Invisible Man Inside a Mystic Cave

How to Create a Surreal Scene with an Invisible Man Inside a Mystic Cave

Learn how to create a surreal photo manipulation with an invisible man. This tutorial will teach you how to blend different images together, create realistic shadows, and paint light reflections in your image.


Preview of Final Results

clip_image002

Surreal Scene Photoshop Tutorial


Tutorial Resources


Step 1: Create a new Photoshop File

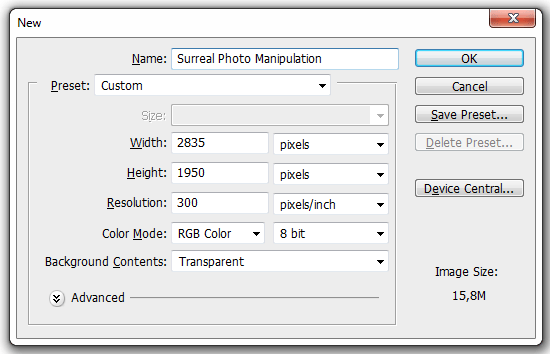
Create a new file in photoshop using these settings:

  • Width: 2835px
  • Height: 1950px
  • Resolution: 300px/inch
clip_image003

Step 2: Add the Cave

Open the cave stock and select the cave using the Quick Selection Tool (Shortcut: W). Here’s a few tips on how to make selections with the Quick Selection Tool, you’ll use them a lot throughout the tutorial:

  • Clicking anywhere in the canvas with the Quick Selection Tool will add to the selection
  • Holding Alt/Option and clicking will subtract the selection
  • You can quickly change the size of your brush holding Alt/Option, clicking anywhere in the canvas with the right mouse button, and dragging to the left to decrease the size of the brush, and to the right to increase it (you can use this technique with any tool that uses a brush)
  • To quickly use the Zoom Tool, hold the Z key, click with the left mouse button in the canvas and drag the mouse to the left to zoom out and to the right to zoom in. When you stop holding Z, you’ll return to the tool you were using before

The result of my selection is painted with red in the image below (I’ll always show my selections painted in light red).
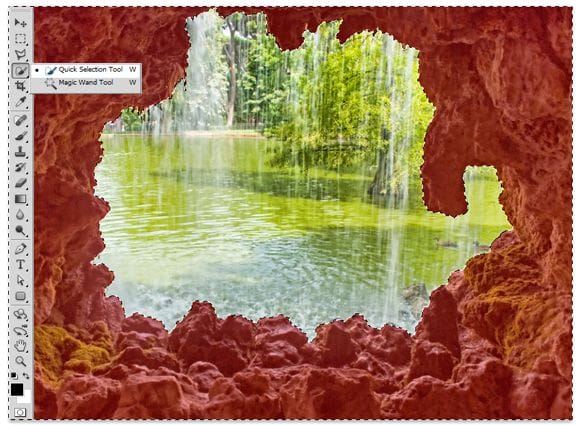
clip_image004

Copy and paste the cave into our project and use the Free Transform Tool (Shortcut: Ctrl/Cmd+T) to adjust it in our project (see image below).

  • You can also use the Move Tool (Shortcut: V) to move the cave, but if you use the Free Transform Tool you can use the image below as reference.
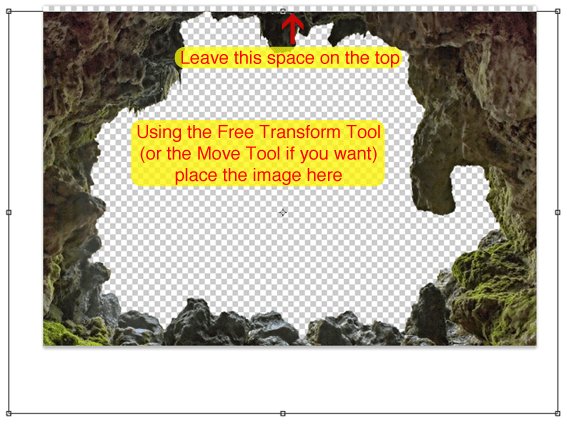
clip_image005

Now select the Rectangular/Marquee Tool (Shortcut: M) and make a selection on the top blank space of our image (see image below for reference).

clip_image006

Press Shift+F5 to open the Fill window and select Content-Aware.

  • After you’re done with your selection, press Ctrl/Cmd+D to deselect your current selection
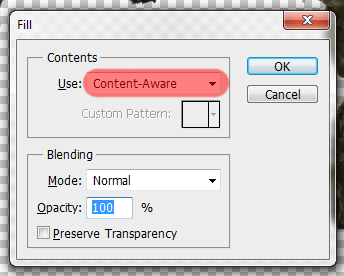
clip_image007

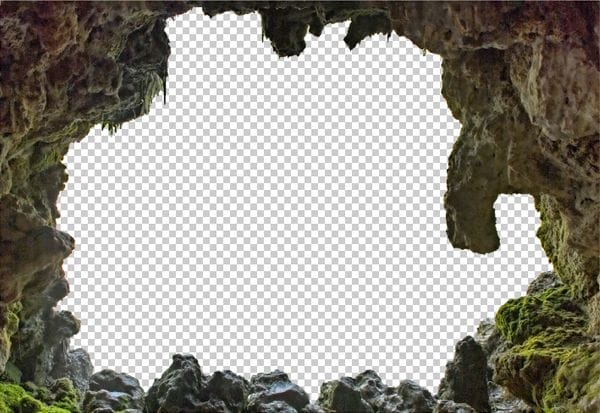
And here is the result:

clip_image008

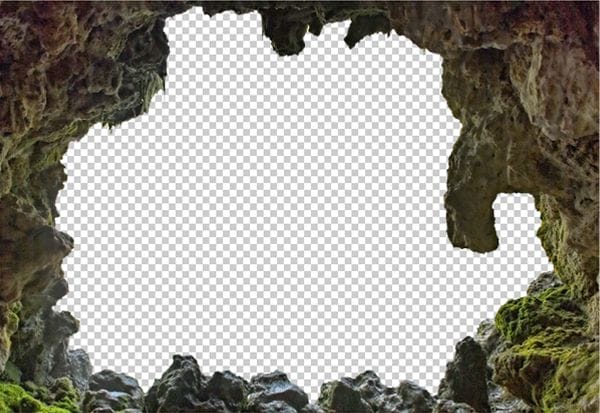
To fix some problems with the edges, Hold Ctrl/Cmd and click in the thumbnail of the Layer 1.
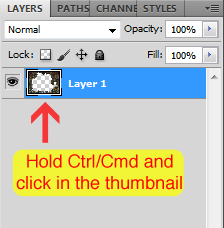
clip_image009

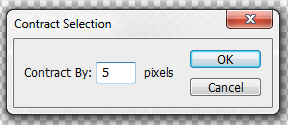
Then go to Select > Modify > Contract and set the contract value to 5px.
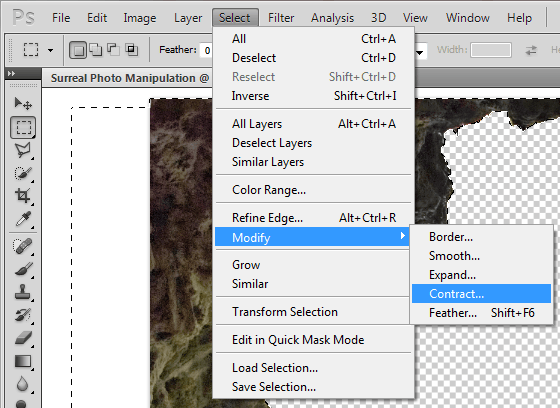
clip_image010
clip_image011

Reverse the selection by pressing Ctrl/Cmd+Shift+I and then hit Delete to erase a little bit of the edges. You probably won’t be able to see the results in the image below, but If you followed the steps correctly your edges should be fixed now.
clip_image012

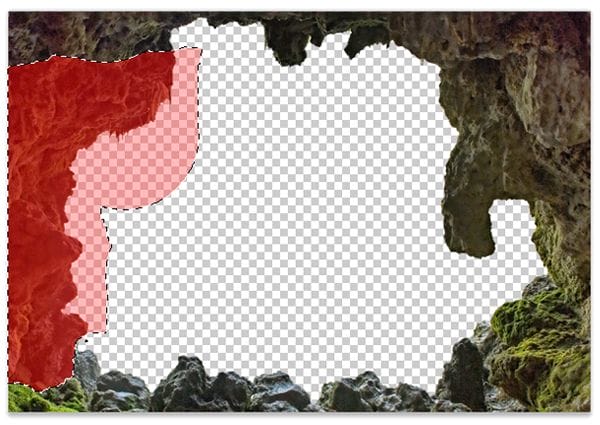
Now make a selection of the left side of the cave using the Quick Selection Tool (Shortcut: W), then copy (Ctrl/Cmd+C) and paste (Ctrl/Cmd+V) into our project.
clip_image013
clip_image014

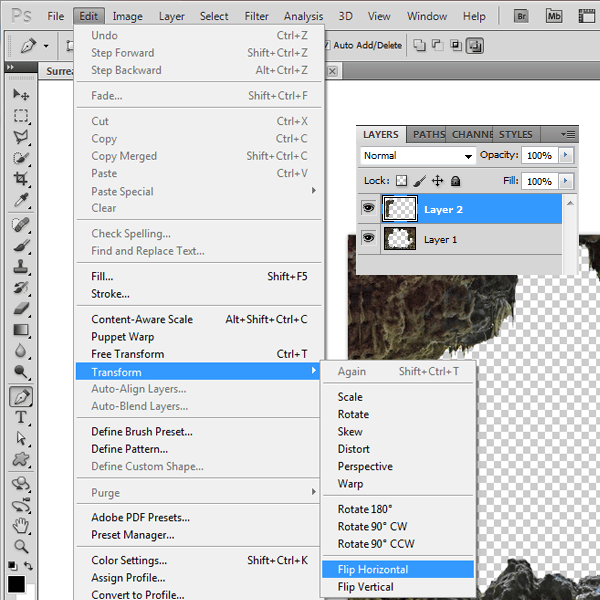
With the Layer 2 selected, go to Edit > Tranform > Flip Horizontal.
clip_image015

Select the Move Tool (Shotcut: V) and move the cave part (Layer 2) to the right side of our image.

clip_image016

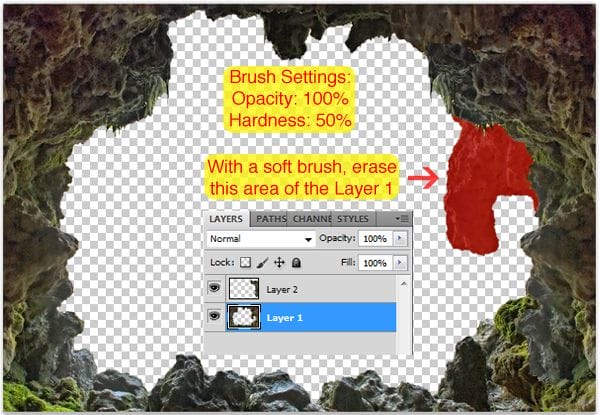
Now let’s erase the part of the cave we don’t want. To do that, select the Layer 1 and use the eraser (Shortcut: E) to delete the red part of the cave in the image below. Here are some notes when dealing with brushs:

  • To change the hardness of a brush, click with the right mouse button anywhere in your project and change the Hardness value
  • To change the opacity of a brush, just change the Opacity value on the toolbar at the top of your screen (it will only appear when you are using a brush)
clip_image017

Go back to the Layer 2 and erase some areas as well (see image below for reference).

clip_image018

Your result should be similar to this:

clip_image019

Select both cave layers (Hold Shift and left click on them) and merge them in one layer (Ctrl/Cmd+E). Then, double click the name of the new layer and change it to Cave.

clip_image020

Let’s fix the colors of our cave now. In the Layers pannel, click in ‘Create a new Fill or Adjustment Layer’ and select Curves.

clip_image021

Adjust the curves like this:

You can also use the Output values in the image below as reference while adjusting the curves

clip_image022

And the cave is done! It should look like this now:

clip_image023

Everytime you add an adjustment layer that you don’t want to affect all of your layers (just the first layer below it), you need to clip it to the that layer, like this:

clip_image024

Now to clean our workspace a little bit, select the Cave and the Curves layer and add them to a new group by pressing Ctrl/Cmd+G. Name the new group Cave.

clip_image025


Step 3: Add the Desert

Open the Desert stock and use the Quick Selection Tool (Shortcut: W) to select it.

clip_image026

Copy (Ctrl/Cmd+C) and paste (Ctrl/Cmd+V) the desert into our project and place its layer below the Cave group.

clip_image027

Use the Free Transform Tool (Ctrl/Cmd+T) to resize the desert without losing the proportion. Here are some tips for this tool:

  • To increase or decrease the size, click and drag one of those little squares on the edges
  • To increase or decrease the size of the image maintaining proportion, hold the Shift key while doing it
  • To see your entire selection, press Ctrl/Cmd+0 and the zoom will be adjusted automatically
clip_image028

Add a Curves adjustment layer like we did with the cave and see the image below for the input values. Like we did before, clip this adjustment to the layer below (the desert layer).

Always remember to clip an adjustment layer to the layer below it (if you don’t want it to affect any other layer)

clip_image029

Here is the result of this curves adjustment:

clip_image030

Add a Color Balance Adjustment Layer and see the image below for the input values. Remember to also clip it to the desert layer.

clip_image031
clip_image032

Your image should look like this now:

clip_image033

Select the desert layer and its adjustment layers and add them to a new group called Desert (Ctrl/Cmd +G).

  • You can also rename the desert layer (Layer 1) to Desert if you want to
clip_image034

Step 4: Add the first underwater stock

Open the Underwater stock (first one on the list), press Ctrl/Cmd+A to select the whole image and copy (Ctrl/Cmd+C) and paste it (Ctrl/Cmd+V) into our project.

clip_image035
clip_image036

Use the Free Transform Tool (Ctrl/Cmd+T) to resize and stretch the ocean. Just click and drag the squares in the edges (you don’t have to hold Shift this time) until you have something like this:

clip_image037

Now add a layer mask to this layer and start painting following the image below. Here are some tips when painting a layer mask:

  • Press B on your keyboard to select the Brush Tool
  • Press D on your keyboard to return the colors of your palette back to Black and White
  • When painting a layer mask, black will hide the layer, and white will reveal it again
  • If you make a mistake while painting a layer mask, you just have to paint the area where you made the mistake with the opposite color again (if you made a mistake while painting with white, paint with black to start over)
  • You can quickly change between your background and foreground color by pressing X
  • To hide a layer mask, hold the Shift key and click on the mask. Do the same thing if you want to reveal it again
  • To view your layer mask hold Alt/Opt and click in the layer mask. Do the same thing to return it to normal
clip_image038
clip_image039

And here is the result:

clip_image040

Step 5: Add the second underwater stock

Open the underwater stock 2, press Ctrl/Cmd+A to select it all, copy (Ctrl/Cmd+C) and paste it(Ctrl/Cmd+V) into our project.

clip_image041
clip_image042

Press Ctrl/Cmd+T to resize and stretch this new underwater stock like we did with the last one.

clip_image043

Like we did with the other underwater image, create a layer mask to this layer and paint (Shortcut to the Brush Tool: B) it following the image below.

clip_image044

Here is the result:

clip_image045

There are some stains in this stock image and we’re going to fix it now. Select the Spot Healing Brush Tool (Shortcut: J) and just start clicking the areas you want to fix.

  • Remember to select the actual image rather than the layer mask before you start
clip_image046

Here is the clean image:

clip_image047

To add the surface of the water, we’re going to go back to the second underwater stock we used and make another selection. Use the Rectangular Marquee Tool (Shortcut: M) to draw this rectangle:

clip_image048

Copy and paste it into our project. Place this layer right below the Cave group and use the Free Transform Tool (Shortcut: Ctrl/Cmd+T) to resize and stretch it.

clip_image049

Here is what your ocean should look like now:

clip_image050

Step 6: Adding the sky

Open the sky stock, select all of it (Ctrl/Cmd+A) and copy and paste it into our project.

clip_image051

Place the sky below all the underwater layers and resize it with the Free Transform Tool (Ctrl/Cmd+T). Remember to hold Shift while doing it.

clip_image052

To finish off, add these four layers to a new group called Ocean+Sky (Ctrl/Cmd+G).

clip_image053

Step 7: Adding some shadows

Create a new layer and place it below our Cave group.

clip_image054

With a hard brush (Shortcut: B), draw a straight line right where the ocean starts after the desert.

clip_image055

Now go to Filter > Blur > Gaussian Blur and set the radius to 40px.

clip_image056
clip_image057

Here is the result:

clip_image058

Now that the main shadow is done, select a soft brush (Shortcut: B) and start painting some more shadows in the image (see image below for reference).

clip_image059

Here is my image with the shadow layer done:

clip_image060

Rename this layer to Ocean/Desert Shadow and we’re done.

clip_image061

Step 8: Adding the fishes

Open the fish pack and select them with the Quick Selection Tool (Shortcut: W). We’re going to use three of them, the smaller one (Underwater_(03)) won’t be used.

Don’t worry too much about the details because they will be really small in our final image. Here’s how I extracted them.

Fish 1:

clip_image062

Fish 2:

clip_image063

Fish 3:

clip_image064

Let’s start with fish number 3. Copy and paste it into our project and use the Free Transform Tool (Ctrl/Cmd+T) while holding the Shift key to resize it.

clip_image065

Now go to fish number 1, copy and paste it two times into our project and resize them using the Free Transform Tool (Ctrl/Cmd+T). Remember to hold Shift while resizing.

Flip one of them horizontally the same way we did before, go to Edit > Transform > Flip Horizontal.

clip_image066

Copy and paste fish number 2 into our project two times. Resize them using the Free Transform Tool (while holding the Shift key) and flip one of them horizontally like we did with fish number 1 (Edit > Transform > Flip Horizontal).

clip_image067

After all the fishes have been placed, select them and merge them (Ctrl/Cmd+E) in a new layer called Fishes.

clip_image068

To take off some of the redness of the fishes, create a new Curves Adjustment Layer like we did before (click in ‘Create a New Filter or Adjustment Layer’ and select ‘Curves’). Change the Blue and Red curves and clip this adjustment to the fishes layer by clicking in the button next to the little eye (you just have to click once to clip it).

clip_image069

To finish the fishes, select their layer and lower the opacity to around 30%.

clip_image070

Here is how your image should look like with the fishes added:

clip_image071

To clean our workspace, select the Fishes and the Curves adjustment layer and add them to a new group called Fishes (Ctrl/Cmd+G).

clip_image072

Step 9: Add some light effects to the background

Create a new layer by hitting Ctrl/Cmd + Shift + N. In the New Layer window that appeared, change the name of the new layer to ‘Lighting’, the mode to Overlay and check the button to fill the layer with 50% gray.

clip_image073

Place the new layer right below the Cave group (it will affect all the layers below it).

clip_image074

Select the Dodge Tool (Shortcut: O), set Range to Midtones, the Exposure to 30% and start painting this layer.

clip_image075

This is an important and complicated step so here are some tips on how to use the Dodge/Burn Tool:

  • The Dodge Tool will make the place you paint brighter
  • The Burn Tool will make the place you paint darker
  • To quickly change between them hold Alt/Option, this will change the tools as long as you hold the Alt/Option key
  • If you made a mistake and it's too late to undo the changes don't worry, just select the Brush Tool and paint the area of the layer you want to "reset" with gray again (#808080)

And here is some tips on how to do the lighting of this scene:

  • The main idea is to make the bright places brighter, and the dark places darker.
  • Imagine a sun in the middle of the sky and think about how it would affect the fishes
  • Use a really small brush and zoom in closely while dealing the fishes
  • Try to use large brushes in the ocean to make it look more natural
  • Make the left side of the sky darker, and the right side brighter
  • Increase the shadow of the ‘ocean wall’ in the desert

Here is my Lighting layer in the Normal mode, so you can use as reference:

clip_image076

And here is the final result:

clip_image077

Now load the Light Beam Brushes in photoshop. If you don’t know how to do this read the step-by-step below, if you already know how to do this you can skip to the next part.

  • Download the .rar file and unpack it anywhere in your computer
  • Take the .abr you just extracted and move it to your Adobe/Adobe Photoshop(…)/Presets/Brushes folder
  • Go back to photoshop, select the brush tool and right click anywhere in your canvas
  • To select your brush, click in the little arrow in the top right corner and check to see if the brush is on the list
  • If it is, just select it and click in Append
clip_image078
clip_image079
  • If it isn’t, you’ll have to click in ‘Load Brushes’ and search for the brush in your computer. Once you found it, the brushes will be appended to your current list of brushes automatically
clip_image080

After you loaded the Light Beam Brushes in photoshop, create a new layer above the Lighting layer and name it ‘Light Beams’.

clip_image081

Select the brush highlighted in the image below, select the white color, and click on the top center of the image to make some light beams.

Resize the brush if needed

clip_image082
clip_image083

Go to Filter > Blur > Gaussian Blur and set the radius to 35px.

clip_image084

The result:

clip_image085

Create a new layer to add more light beams just like we did with the other one. Place it above our previous Light Beam layer and also name it ‘Light Beams’.

clip_image086

Select the brush highlighted below and hit F5 to bring the Brush panel. Change the angle of the brush to -35º.

clip_image087
clip_image088

Now do the exact same thing we did before, click in the screen just once with these settings.

  • Again, change the size of the brush if you have to
clip_image089

Go to Filter > Blur > Gaussian Blur again and set the radius to 25px this time.

clip_image090

And here is the result:

clip_image091

To finish the light beams, create a new layer by pressing Ctrl/Cmd+Shift+N, change the name of the new layer to ‘Light Beams’ again, set the mode to Screen and check the button to fill the screen with black.

clip_image092

Make sure this layer is above the other light beams.

clip_image093

Go to Filter > Render > Lens Flare.

clip_image094

Set the Brightness to 75%, select 105mm Prime and click on the top of the black box, in the center, like this:

clip_image095

Here is the result:

clip_image096

Now group the three Light Beams layers in a new group called Light Beams (really original) and set the opacity of this group to around 85%.

clip_image097

The last thing to do here is to add a layer mask to this group and paint the left side of the sky with black.

clip_image098
clip_image099

And here is the result:

clip_image100

Step 10: Adding the Ship

Download the ship pack and open the ‘pship3’ file in photoshop. To select it, hold Ctrl/Cmd and click in the thumbnail of the image.

clip_image101
clip_image102

Copy and paste the ship into our project and rename this layer to Ship. Place it above the Light Beams group.

clip_image103

Flip it horizontally by going to Edit > Transform > Flip Horizontal. Then resize it using the Free Transform Tool (remember to hold Shift) and place it on the left side of our image.

clip_image104

While in the Free Transform Mode, set the Rotate value to -3,5º (the Rotate tool is located at the top toolbar).

clip_image105

Create a new layer mask to the Ship layer.

clip_image106

Grab a soft brush, select the layer mask of the ship and start painting with black to hide the lower part of the ship.

clip_image107

The result:

clip_image108

Let’s create some reflections in the water, duplicate the ship layer by selecting it and pressing Ctrl/Cmd+J.

clip_image109

With the duplicated layer selected, go to Edit > Transform > Flip Vertical.

clip_image110

Use the Move Tool (Shortcut: V) to move this layer below the ship.

clip_image111

Rename this layer to Shadow and place it below the ship layer.

clip_image112

Now select the Shadow layer and go to Filter > Blur > Motion Blur. Set the angle to 0 and the distance to 12px.

clip_image113
clip_image114

Here is the result:

clip_image115

Select the layer mask of the Shadow layer and paint it with black to hide some areas. After you’re done, set the opacity of this layer to around 85%.

  • In the image below, paint more times in the areas where the red is stronger
clip_image116

Here is the result:

clip_image117

With the Ship layer selected, create a new layer pressing Ctrl/Cmd+Shift+N and input the following values.

clip_image073[1]

Now select the Dodge Tool (Shortcut: O) again, set the Exposure to 50% and paint the ship to make it look like the sun is on the right side of the ship.

Here is my Lighting layer at Normal mode for reference.

clip_image118

And here is the result of this effect:

clip_image119

To finish this step, select these three layers we created and add them to a new group called Ship.

clip_image120

Step 11: Adding some bubbles

Download the bubbles brushes and load them into photoshop just like we did with the light beam brushes. After that, create a new layer below the lighting layer and name it Bubbles.

clip_image121

Then select one of the bubble brushes and start adding some bubbles into the ocean.

clip_image122
clip_image123

Result:

clip_image124

To make the bubbles look more natural we’re going to add a Layer style to it. Double click the bubbles layer to open the style panel and check the images below for the input values.

clip_image125
clip_image126

Here is my final result with the bubbles layer.

clip_image127

And we’re finally done with the background of our image. To clean the workspace, select all the layers and groups below the Cave group and add them to a new group called Background.

clip_image128

Step 12: Adding some life to the cave

Let’s add some life to the cave now. Open the Lily 1 stock, use the Quick Selection Tool (Shortcut: W) to select it, and copy and paste it into our project. Make sure that you paste all the elements of this step between the Cave and the Background group.

clip_image129
clip_image130

Use the Free Transform Tool (Ctrl/Cmd+T) as usual to resize it. Remember to hold Shift while resizing to maintain proportion (we don’t wanna lose the proportions in this step).

  • You can also use the Free Transform Tool to rotate the image, just click outside the image and drag the mouse around to rotate it
  • If you hold the Shift key while rotating, you will increase/decrease 15º each time
  • The Width/Height/Rotate values highlighted in the images below are not exact, they are just for reference
clip_image131

Now open the second lily stock and select the middle one using the Quick Selection Tool (Shortcut: W). Then copy and paste it two times into our project.

clip_image132
clip_image133

Use the Free Transform Tool (Ctrl/Cmd+T) to resize and rotate the lilies, see the images below for the placement place.

clip_image134
clip_image135

Open the third lily stock and do the same steps we did before, select the lily with the Quick Selection Tool (Shortcut: W), copy and paste it into our project.

clip_image136
clip_image137

Now use the Free Transform Tool (Ctrl/Cmd+T) again to resize and rotate this lily. Place it on the bottom of our image.

clip_image138

Open the last lily stock (lily 4) and select it with the Quick Selection Tool (Shortcut: W)

clip_image139

Copy and paste it into our project.

clip_image140

Use the Free Transform Tool (Ctrl/Cmd+T) to resize and rotate this last lily. See the image below for the placement place.

clip_image141

Open the tropical plant stock and make a selection using the Quick Selection Tool (Shortcut: W).

clip_image142

Now go to Select > Modify > Contract to fix some of the edges.

clip_image143

Set the Contract value to 3px.

clip_image144

After that, copy and paste the plant two times into our project.

clip_image145

Use the Free Transform Tool (Ctrl/Cmd+T) to resize one of the plants and place it on the right side of our image (You don’t need to rotate them).

clip_image146

Select the other plant and flip it horizontally by going to Edit > Transform > Flip Horizontal.

clip_image147

After that, resize it using the Free Transform Tool (Ctrl/Cmd+T) and place it on the left side of our image like this:

clip_image148

To finish this step, let’s add a hummingbird in one of our lilies. Open the hummingbird stock in photoshop and select it like we did with the ship (Ctrl/Cmd click the thumbnail of the image).

clip_image149

Copy and paste it into our project and flip it horizontally like we did with the plant above (Edit > Transform > Flip Horizontal).

clip_image150

Now resize it using the Free Transform Tool (Ctrl/Cmd+T) and place it on the left side of our image.

clip_image151

Here is our final image with the bird and the plants added:

clip_image152

Now merge all these layers in one (select them and press Ctrl/Cmd+E). Name this new layer ‘Plants and bird’.

clip_image153

To finish this step, let’s add some lighting to the elements we just added. As usual, select the layer we just created and hit Ctrl/Cmd+Shift+N to create a new layer with the following settings:

clip_image154

Now grab the Dodge Tool (Shortcut: O), set the range to midtones, the exposure to 50% and start adding some shadows and lighting to our plants.

  • We clipped this layer to our ‘Plants and Bird’ layer, so you don’t have to be so precise with your painting because it will only affect the plants and the bird, not the background
  • Give the plants some lighting in the top (based on the position of the sun)
  • Paint some dark areas in the bottom of the plants and the bird
clip_image155

Here is my Lighting layer in normal mode:

clip_image156

And here is the result of my lighting layer:

clip_image157

To finish this step, add these two layers we created into a new group called ‘Plants and Bird’.

clip_image158

Step 13: Add some people to our scene

Let’s add the girls in our cave. Open the Girl 1 stock and select her using the Quick Selection Tool (Shortcut: W).

clip_image159

Copy and paste it into our project and place her layer above the Cave group.

clip_image160

Use the Free Transform Tool (Ctrl/Cmd+T) as usual to resize her (remember to hold Shift). Then move her to the left side of our image.

clip_image161

Let’s add a torch in the hand of the girl. Open the photoshop file Old Torch and select it by holding Ctrl/Cmd and clicking in the thumbnail of the Layer 1 of this project.

clip_image162

clip_image163­

Now use the Free Transform Tool (holding Shift) to resize and rotate the torch like this:

clip_image164

Let’s improve the fire a little bit, select the Smudge Tool with a 1px brush and set the Strength to 80%. Then click and drag some areas of the fire to make it look more natural (see image below for reference).

clip_image165

Here is my result:

clip_image166

Now that this girl is ready, let’s add another one to the other side. Open the Girl 2 stock and select her using the Quick Selection Tool (Shortcut: W).

Don’t worry too much about little details over the hair because she will be really small in our final image

clip_image167

Copy and paste her into our project.

clip_image168

Now resize her using the Free Transform Tool (holding Shift) and place her on the right side of our image.

clip_image169

Now that the girls are in place, let’s add their shadows in the cave. Create a new layer, name it Shadow and place it above the Cave group.

clip_image170

Now grab a soft brush and start painting this layer with black following the image below:

clip_image171

To give the shadows a more natural look, go to Filter > Blur > Gaussian blur and set the radius to 7px.

clip_image172
clip_image173

And here is the result:

clip_image174

Let’s add some lighting to the girls. First, merge (Ctrl/Cmd+E) the girls and the torch into a new layer called Girls.

clip_image175

Now create a new layer pressing Ctrl/Cmd+Shift+N and set the values below:

clip_image154[1]

Select the Dodge Tool (Shortcut: O), set the Range to Midtones, the Exposure to 50%, and start painting the Lighting layer.

  • Make it look like the sun is affecting the girls
  • Make the torch brighter
clip_image176

Here is my lighting layer in normal blending mode for reference.

clip_image177

And here is the result:

clip_image178

To finish this step, select these three layers we just created and add them to a new group called Girls.

clip_image179

Step 14: Add the invisible man

Let’s start the main part of our image. Open the tree stump stock and select it using the Quick Selection Tool.

clip_image180

Copy and paste the stump into our project and place its layer between the ‘Plants and Bird’ and the ‘Background’ group.

clip_image181

With the Free Transform Tool (Ctrl/Cmd+T) , hold the Shift key and resize the stump. Place it on the bottom of our image.

clip_image182

Now open the invisible man and use the Quick Selection Tool to select only his body. We’ll come back for the hat later.

clip_image183

Copy and paste it into our image. Make sure his layer is above the stump layer.

clip_image184

Now use the Free Transform Tool (holding Shift) to make him smaller and place him above the stump.

clip_image185

Go back to the invisible man image and use the Quick Selection Tool to select his hat this time (we don’t want the glasses).

clip_image186

Copy and paste the hat into our project and use the Free Transform Tool (Ctrl/Cmd+T) as usual to resize (holding Shift) and position it.

clip_image187

To add the light bulb, we’re going to press U to select the Custom Shape Tool.

clip_image188

Now select the light bulb from the toolbar at the top of the screen.

If you don’t see the light bulb, click in that little arrow on the top right corner and select Reset Shapes

clip_image189

Now select the white color and draw a small light bulb below the hat of the invisible man. Make sure you hold Shift while drawing to maintain the proportions and check to see if Shape layers is selected.

clip_image190

After that, use the Free Transform Tool (Ctrl/Cmd+T) in this layer to rotate the light bulb a little bit. Set the rotation to -8,5º.

clip_image191

Double click this Shape 1 layer to add some Layer Style. Add an Outer Glow like this:

To change the Contour don’t click in the thumbnail, click in the arrow on the right

clip_image192

The result:

clip_image193

Let’s add the shadow of the man in the stump. Create a new layer called Shadow and place it between the man and the stump layer.

clip_image194

Select a soft brush (Shortcut: B) and start painting with black some contact shadows in the stump and the desert (see image below).

clip_image195

Then go to Filter > Blur > Gaussian Blur and set the radius to 6px.

clip_image196

Here is the result:

clip_image197

Now let’s add some lighting to these layers. Merge (Ctrl/Cmd+E) them into one new layer called ‘Invisible Man’.

clip_image198

Create a new layer hitting Ctrl/Cmd+Shift+N and set this values:

clip_image199

Select the Dodge Tool (Shortcut: O) with Range at Midtones and Exposure at 50% and start making the lighting of the invisible man.

  • Think about how the sun would affect him
  • Improve the contact shadows of the man in the stump
clip_image200

Here is my finished lighting of the invisible man in normal mode for reference.

clip_image201

And here is my actual result:

clip_image202

To finish this step, let’s add more shadow in the desert. Create a new layer pressing Ctrl/Cmd+Shift+Alt/Opt+N and place it below our ‘Invisible Man’ layer. Name this new layer Shadow.

clip_image203

Select a soft brush with the black color and start painting the areas shown below.

  • Stronger arrows mean 100% opacity
  • Lighter arrows mean 50% opacity
clip_image204

As usual, we’ll add a Gaussian Blur to make the shadows look more natural. Go to Filter > Blur > Gaussian Blur and set the radius to 9px.

clip_image205
clip_image206

And here is the result:

clip_image207

Last thing to do here is to group the layers we created in this step in a new group called ‘Invisible Man’.

clip_image208

Step 15: Add the pedestal

Open the pedestal stock and use the Quick Selection Tool to extract it. Then copy and paste it into our project.

clip_image209

Resize the pedestal with the Free Transform Tool (Ctrl/Cmd+T) while holding the Shift key. Then place the pedestal layer between the ‘Invisible Man’ and the ‘Plants and Bird’ groups.

clip_image210

Create a new layer pressing the button in the Layers panel or using the shortcut Ctrl/Cmd+Shift+Alt/Opt+N. Name this new layer Shadow and place it below the pedestal layer.

clip_image211

Select a soft brush (Shortcut: B) with the black color and start painting shadows like this:

clip_image212

Then add a Gaussian Blur by going to Filter > Blur > Gaussian Blur. Set the Radius to 11px.

clip_image213

Here is the result:

clip_image214

To finish this step, group these two layers into a new group called Pedestal. We’ll return to this group later.

clip_image215

Step 16: Add the planet

Open our last stock, the planet, and use the Elliptical Marquee Tool (Shortcut: M) to make a round selection on the planet in the left.

  • Hold Shift to make a perfect circle
  • While making the selection, press and hold the Space Bar to move the selection around
clip_image216

Copy and paste the planet into our project (place this layer below the ‘Plants and Bird’ group. Use the Free Transform Tool (Ctrl/Cmd+T) to make it smaller and place it above the pedestal.

clip_image217
clip_image218

Double click the planet layer to add some layer style.

  • To change the Contour don’t click in the thumbnail, click in the arrow on the right
clip_image219

The Gradient Editor:

clip_image220

Back to the Layer Style:

clip_image221

Here’s the result on the planet:

clip_image222

Create a new layer pressing the button in the Layers panel or using the shortcut Ctrl/Cmd+Shift+Alt/Opt+N. Name this new layer ‘Planet Light’ and place it below the planet layer.

clip_image223

Load the Light Beam brushes again and select this one:

clip_image224

Select a light yellow (#ffff62) and click once behind the planet. Remember to adjust the size of the brush before you paint.

clip_image225

Now go to Filter > Blur > Gaussian Blur and set the radius to 13px.

clip_image226
clip_image227

Here is the result:

clip_image228

To finish this step, group these two layers into a new group called Planet.

clip_image229

Step 17: Adding the light chains

Create a new layer pressing the button in the Layers panel or using the shortcut Ctrl/Cmd+Shift+Alt/Opt+N. Name this new layer ‘Chain’ and place it above the Planet group.

clip_image230

Grab the Pen Tool (Shortcut: P) and make the path shown below:

clip_image231

Then go back to the Brush Tool (Shortcut: B) and open the Brush Presets (you can go to Window > Brush Presets if you can’t see it). Set 12px for the brush size and select the highlighted brush.

Make sure the opacity of your brush is at 100%

clip_image232

Select a light blue for the color (#a0edee) and hit A to select the Path/Direct Selection Tool. Then right click the path we made and select Stroke Path.

clip_image233
clip_image234

Check Simulate Pressure and click OK.

clip_image235

Here is the result:

clip_image236

You can accept the path now (just click the check button on the upper toolbar). This will make the path go away. Now duplicate this layer two times (Shortcut: Ctrl/Cmd+J) and use the Move Tool (Shortcut: V) to place them like this:

If you’re not happy with the results you can use the Free Transform Tool (Ctrl/Cmd+T) to stretch them a little bit

clip_image237

Double click the Chain layer and add an Outter Glow with these settings:

clip_image238

Now right click the Chain layer and click in ‘Copy Layer Style’.

clip_image239

Then right click ‘Chain copy’ and ‘Chain copy 2’ and click in ‘Paste Layer Style’. You should have something like this now:

clip_image240

Create a new layer pressing the button in the Layers panel or using the shortcut Ctrl/Cmd+Shift+Alt/Opt+N. Name this new layer ‘Middle Chain’ and place it below the other Chain layers.

clip_image241

With the same type of brush, the same color and opacity, draw the path (Pen Tool shortcut: P) shown below and stroke it (Press A > Right Click the path > Stroke Path) without checking the ‘Simulate Pressure’ box this time.

clip_image242
clip_image243
clip_image244
clip_image245

Like we did before, right click in one of the three chain layers we created before and click in ‘Copy Layer Style’. Right click the Middle Chain layer and select ‘Paste Layer Style’. You should have something like this now:

clip_image246

Now create a new group with the layers ‘Chain’, ‘Chain copy’ and ‘Chain copy 2’. Name this new group ‘Right Chains’.

clip_image247

Create a new group called ‘Left Chains’ and create a new layer inside it called ‘Chain’. Place this new group above the Right Chains group.

clip_image248

We’re going to repeat the exact same steps we did with the chains in the leg of the invisible man, so I’m just going to add all the images of the process and you can follow along.

  • Copy the Layer Style of any of those chains we already did
clip_image249
clip_image250
clip_image251
clip_image252

After I created ‘Chain copy 3’ and ‘Chain copy 4’ I resized them with the Free Transform Tool (Ctrl/Cmd+T) to fit the body of the pedestal right.

clip_image253

And here is what you should have so far:

clip_image254

And the layers:

clip_image255

We’re almost done with the chains. Create another layer (Ctrl/Cmd+Shift+Alt/Opt+N), name it ‘Pedestal Chain’ and place it above the other chain layers.

clip_image256

Now grab the Pen Tool again (Shortcut: P) and draw this path on the pedestal:

clip_image257

Again with the same opacity, color and type of brush, stroke this path by pressing A, right clicking the path and going to ‘Stroke Path’.

clip_image258

Don’t check the ‘Simulate Pressure’ box.

clip_image259

And you should have something like this:

clip_image260

Now erase (Shortcut: E) some areas of this chain to make it look like it’s going around the pedestal (see image below).

clip_image261

The last thing we need to do is copy the layer style we’ve been using in the chains and paste it into the ‘Pedestal Chain’ layer.

clip_image262

And we’re finally done with the chains! If you did everything right you should have something like this now:

This is a hard step so take your time in it, repeat over and over again the paths if you need to, until you’re satisfied with the results

clip_image263

As expected, we’re going to clean our workspace a little bit by adding all these chain layers and groups into a new group called Chains.

clip_image264

Step 18: Add some sparks

It’s been a long tutorial but we’re finally starting to enter the final steps. We’re done with adding new images and elements into our image, in this step we’re just going to add some small details.

Create a new layer through the shortcut Ctrl/Cmd+Shift+Alt/Opt+N and name it ‘Lightbulb Sparks’. Place it between the ‘Invisible Man’ and the ‘Background’ group.

clip_image265

Before we start, let’s add the layer style we’re going to need. Double click this layer and add an Outter Glow like this:

clip_image266

Now select a simple brush and go to the Brush pannel (if you don’t see it go to Window > Brush). Now add some styles following the images below:

clip_image267
clip_image268
clip_image269
clip_image270

Now set the opacity of this brush to 100%, the color to white, and start painting at random around the lightbulb.

clip_image271

When you’re done, erase the parts you don’t want (outside the lightbulb) using the Eraser (Shortcut: E) and you should have something like this:

clip_image272

Don’t change your brush yet cause we’re going to use it again right now. Create a new layer using Ctrl/Cmd+Shift+Alt/Opt+N and name it ‘Chain Sparks’. Place it above the Chains group.

clip_image273.

Like we did before, let’s start with the Layer Style. Double click this layer and add these two styles:

clip_image274
clip_image275

Now that the layer style is ready, just grab the brush we created before and start painting the chains with a light blue (#60ebed). Like this:

clip_image276

With the sparks added, your image should be looking like this:

clip_image277

And your layers should be like this:

  • The layer styles are still there, I just collapsed them (clicking in that arrow next to “fx”) to clean the workspace
clip_image278

Step 19: Adding some lighting to the pedestal

We didn’t added the lighting layer to the pedestal before because we didn’t had the chains done. Now that we have them we can go back to the pedestal group and add it.

Open the pedestal group, select the pedestal layer (in my case it’s Layer 5) and hit Ctrl/Cmd+Shift+N to add a new layer.

clip_image279
clip_image280

Select the Dodge Tool (Shortcut: O) and start painting the pedestal.

  • Think about the light of the planet, the light of the chain and the light of the sun
clip_image281

Here is my pedestal with the blending mode set to Normal to be used as reference.

clip_image282

And with the Overlay blending mode:

clip_image283

Step 20: Painting the Image

There are a lot of different colors in our image, all sorts of glows, but right now there’s no reflection of them in the elements of the image. To fix that, we’re going to paint our image.

Let’s begin creating a new group called ‘Colors’ and adding a new layer to it called ‘Yellow’. Place the group with this layer above all the other groups of our image.

clip_image284

You can use any brush you want to paint the image (try the brushes at the Brush Presets). I’m going to use a simple round brush with 0% hardness. One thing that you have to remember while painting is to leave the painting blending mode set to Color, like this:

clip_image285

Since we added a layer called Yellow, we’re going to start painting with yellow. Use the Eyedropper Tool (hold Alt/Opt while using the Brush Tool) on the yellow of the planet and start painting. Here are some tips to get you started:

  • The opacity of the brush will change a lot during the painting. Usually the opacity will be higher when painting closer to the edges (I paint with 3~25% opacity)
  • The size of the brush will also change a lot during the painting, don’t be afraid to pick a small brush and zoom in a lot to do some details
  • If it doesn’t look natural after you painted, add a Gaussian Blur (Filter > Blur > Gaussian Blur). You’ll do that a lot
  • You can also use the Eyedropper Tool by pressing I on your keyboard
  • You can press CAPSLOCK to view the center of your brush instead of seeing the size of your brush (this might help while painting)
  • Not every place will need the same amount of Gaussian Blur, so you’ll need to make selections of each part of the painting and apply the right amount of Gaussian Blur in that area
  • You can use any tool you want to make the selections (Quick Selection Tool, Rectangular Marquee Tool and even the Pen Tool). Just remember that the Gaussian Blur will never go out of the selected area, so you have to let some room for it
  • Try not to paint really close to the edges because the Gaussian Blur will affect the painting in all the directions (You can also paint the edges, apply the Gaussian Blur and then use the Move Tool (Shortcut: V) to move it to the right place if you want)

Here is my yellow layer against a black background so you can see it and use it for reference:

clip_image286

And here is the result of my yellow layer:

clip_image287

Following the steps we did to paint with the yellow color, we’re going to paint now with other colors like Blue, Orange and Red. I’m going to repeat the steps we just did for each one of the colors and show you the results below.

clip_image288
clip_image289
clip_image290
clip_image291
clip_image292
clip_image293
clip_image294
clip_image295
clip_image296

I’m going to stop here but feel free to use how many colors you want in this step.


Step 21: Final Adjustments

Once you’re satisfied with the colors of your image create a new group called ‘Final Effects’. This group will have all the adjustments we’re going to make in this step.

clip_image297

Add a new layer (Ctrl/Cmd+Shift+Alt/Opt+N), press D to reset the colors of your palette, and press Alt/Opt+Delete to fill this layer with black.

Now grab the Eraser Tool (Shortcut: E) and erase the main part of our image (see image below). This will hide the cornes of our image, making the viewer focus more on the details inside our cave.

clip_image298

Press Ctrl/Cmd+Shift+Alt/Opt+E to merge your image into a new layer while leaving all the other layers in your project intact.

clip_image299

With this new layer selected, go to Filter > Render > Lighting Effects.

clip_image300

Check the image below for the input values:

clip_image301

The result:

clip_image302

Add a Photo Filter (see image below).

clip_image303

Select the Blue filter and change the Density to 15%.

clip_image304

Result:

clip_image305
clip_image306

Add a Brightness/Contrast adjustment and set the Contrast to +20.

clip_image307
clip_image308

Here is the result:

clip_image309
clip_image310

Press G to select the Gradient Tool, and change the gradient (click in the thumbnail of the gradient on the top toolbar).

clip_image311

Select the first gradient from the second line:

clip_image312

Now create a new layer (Ctrl/Cmd+Shift+Alt/Opt+N) above all the other layers and click and drag to form the gradient (see image below).

clip_image313

Change the blend mode of this layer to Soft Light and lower the opacity to around 30%.

clip_image314

Here is the result:

clip_image315

Add a Black & White adjustment and choose the High Contrast Red Filter.

clip_image316
clip_image317

Now change the blend mode of this layer to Overlay and lower the opacity to around 25%.

clip_image318

Here is the result:

clip_image319

Add a Selective Color adjustment and see the image below for the input values.

clip_image320
clip_image321

Here’s the result:

clip_image322
clip_image323

Last but not least, add a Levels adjustment.

clip_image324

Set the middle slider to 1,15.

clip_image325

And here is the final result of our photo manipulation:

clip_image002[1]
clip_image326

Final Results

clip_image002[2]

Tutorial by Guilherme Pejon

clip_image327Thanks for following this tutorial! I hope you've learned a thing or two here (even if it was just some shortcuts) and I hope that you were able to follow along with no problems. I’ll see you again on another tutorial soon. Have Fun!.

- Guilherme Pejon

90% Off Cyberpunk Preset Bundle
Sponsored

Make your artwork look like they're from an alternate universe. These Cyberpunk presets work with Photoshop (via the Camera Raw filter) and Lightroom. Download all 788 presets for 90% off.

10 comments on “How to Create a Surreal Scene with an Invisible Man Inside a Mystic Cave”

Leave a Reply

Your email address will not be published. Required fields are marked *

cross